 Pin This
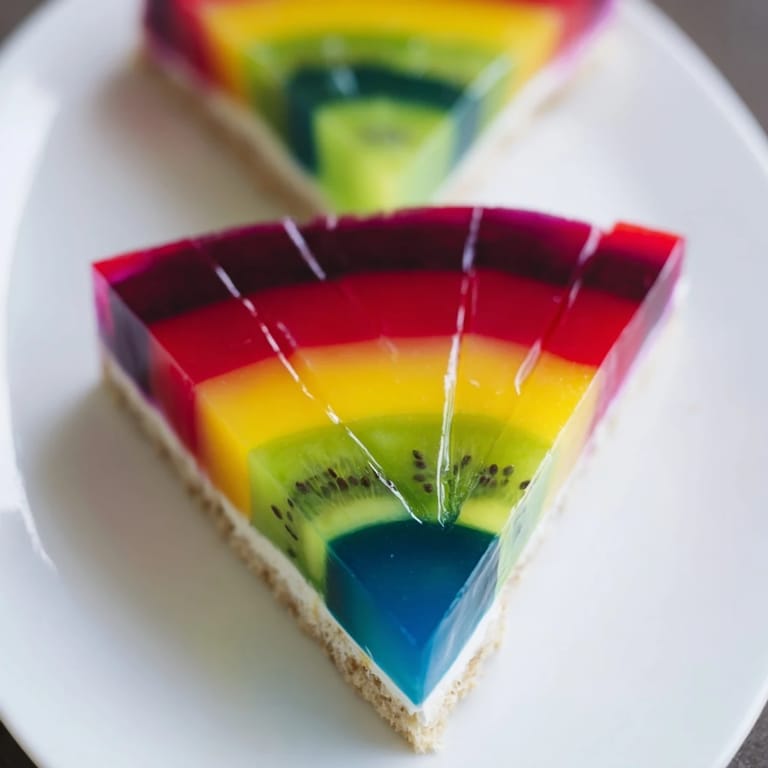
 The first time I saw a kaleidoscope dessert at a modernist café, I couldn't stop staring at it. Those perfect V-shaped segments of color seemed impossible to create at home, like something only professional pastry chefs could manage. But watching the baker explain the technique over coffee, I realized it was mostly about patience and a little creative engineering with foil dividers. I went home determined to recreate that magic, and what started as an intimidating project became one of my favorite party tricks. Now every time I make it, I remember that moment of doubt turning into quiet confidence.
I made this for a friend's birthday dinner, and watching everyone lean in to admire it before tasting felt like the dessert had already done its job. Someone asked if I'd bought it from a bakery, and I'll admit I let them wonder for a second before confessing. The best part wasn't the compliments though—it was seeing my seven-year-old niece carefully eating around each color, trying to taste them separately, treating each segment like it deserved its own moment.
Ingredients
- Whole milk and heavy cream: The foundation that carries all those beautiful fruit flavors without overwhelming them; equal parts creates a balanced texture that's neither too heavy nor too thin.
- Granulated sugar: Just enough sweetness to let the fruit shine through, though you can adjust up or down depending on how tart your purees are.
- Powdered gelatin or sheets: The invisible hero that holds everything together; powdered dissolves faster, but sheets give you more control over texture if you're precise about soaking time.
- Vanilla extract: A whisper in the background that ties all five flavors into one coherent experience.
- Food coloring in five shades: Gel colors are more forgiving than liquid; a tiny drop goes a long way, and it's easier to adjust without diluting your mixture.
- Fruit purees: The soul of this dessert; use whatever's in season or frozen fruit blended smooth, as long as the flavors complement each other.
- Digestive biscuits or graham crackers: A sturdy base that won't turn to mush; the buttery crumb provides the right textural contrast to the silky gelatin layers above.
- Unsalted butter: Better to add your own salt control than fight overly salted biscuits.
Tired of Takeout? 🥡
Get 10 meals you can make faster than delivery arrives. Seriously.
One email. No spam. Unsubscribe anytime.
Instructions
- Build your foundation:
- Crush biscuits into fine, even crumbs—you want texture, not dust. Mix with melted butter until it resembles wet sand, then press it firmly into the pan base, working it into the corners with the back of a spoon. The pressure matters here; a loose base will shift when you pour the liquid layers.
- Wake up the gelatin:
- Sprinkle it over cold water and let it sit undisturbed for exactly 5 minutes—this blooming step ensures smooth, lump-free gelatin when it dissolves. If using sheets, they'll absorb water slightly differently but follow the same timing.
- Heat the cream mixture:
- Watch the saucepan closely as milk and cream warm; you're looking for steam and movement at the edges, not a rolling boil. Once it's hot enough, the gelatin will dissolve instantly when stirred in, and you'll feel the mixture turn silky under your whisk.
- Color and flavor your five sections:
- Divide the base mixture while it's still warm so the additions blend smoothly. Start with just one drop of color per portion, taste as you go, and remember that gelatin can taste slightly metallic—the fruit puree masks this beautifully if you use enough of it.
- Create the V-shaped magic:
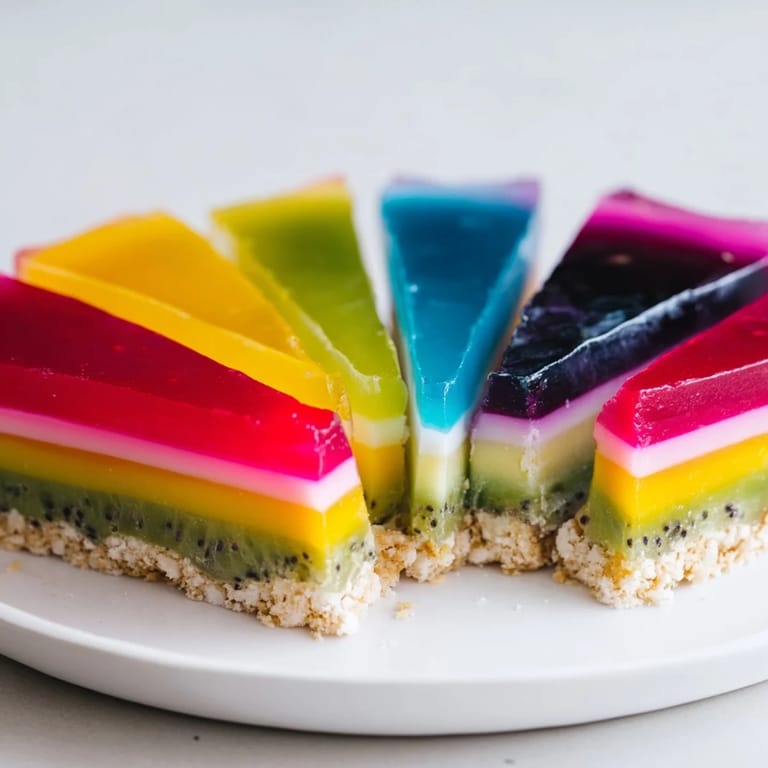
- Use aluminum foil folded into five wedge dividers, or score cardboard pieces carefully; position them from the center point outward like pizza slices. This is the visual trick that makes people think you're a professional; take a breath and pour slowly so the colored layers don't mix at the boundaries.
- Set and remove dividers:
- After 30 minutes in the refrigerator, the gelatin will be firm enough to hold its shape when you gently lift the dividers away. Work slowly and use a thin knife to help loosen any edges that have adhered to the foil.
- Final chill and slice:
- Give it at least 2 more hours before cutting; this lets the layers bond slightly and makes slicing cleaner. A hot knife dipped in water between each cut creates those sharp, magazine-worthy edges.
 Pin This
 There's a moment after you remove the dividers and see all five colors still perfectly separated, each one bright and distinct, when you realize you've actually pulled this off. It's oddly satisfying, like solving a puzzle that looked impossible five minutes before.
Timing Your Layers Right
The 30-minute set between removing dividers and final chilling is crucial but easy to misjudge. Too soon and the layers merge at the edges; too long and you risk the gelatin becoming rubbery. I keep a little extra mixture in a ramekin to test—when it quivers gently instead of jiggling freely, you know the pan is ready. Room temperature matters too; a warm kitchen means shorter setting times, so plan accordingly if it's summer or your heating is aggressive.
Flavor Pairing That Actually Works
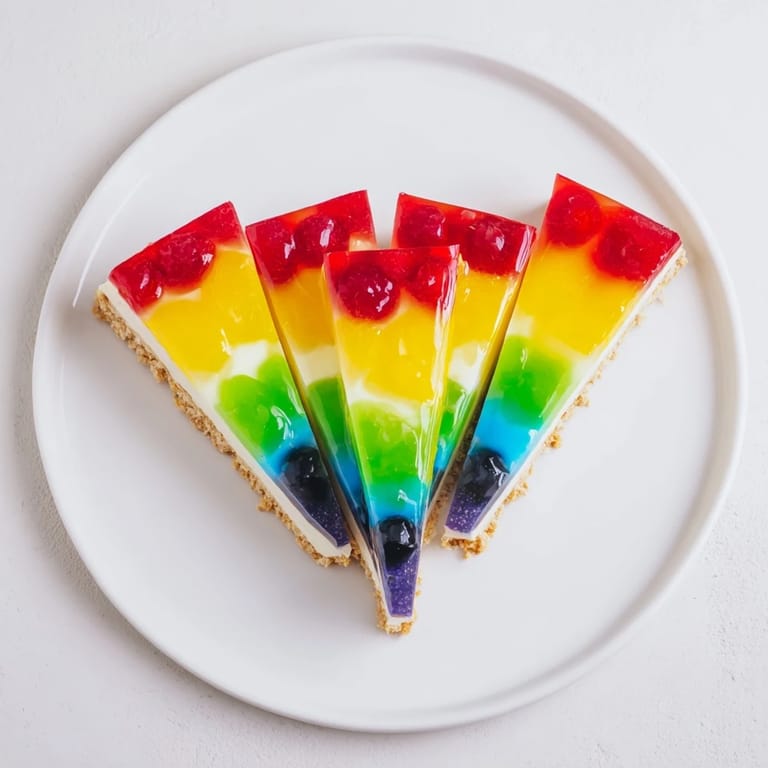
Raspberry and blackberry sit naturally beside each other because they share tart notes; mango brings brightness and richness; kiwi adds a subtle green-apple edge; blueberry grounds everything with deeper flavor. You're not just picking colors—you're creating a flavor journey that travels clockwise around the pan. Taste your fruit purees before committing; some are naturally sweeter or more acidic, and that changes how much extra sugar you need dissolved in the base mixture.
Making It Your Own
The beauty of this dessert is that it's endlessly customizable without losing its visual impact. Swap in coconut milk for a vegan version, use agar-agar instead of gelatin if you need to avoid animal products, or choose fruit flavors based on what's available at your market. One unexpected discovery: passion fruit puree adds complexity that single-flavor fruits can't match, and a tiny bit of lemon juice in the cream mixture brightens the whole thing without tasting citrusy.
- Fresh whipped cream or Greek yogurt on the side transforms it into something dessert-adjacent enough for a light brunch.
- If your fruit purees are watery, strain them through cheesecloth first to avoid diluting the gelatin mixture.
- Make the base layer a day ahead if you need to spread your prep time across two days.
 Pin This
 This dessert sits at the intersection of visual drama and genuine flavor, which is honestly all you can ask from something sweet. Make it once and you'll understand why it keeps surprising people.
Recipe FAQ
- → How do I achieve the distinct V-shaped segments?
Use aluminum foil or cardboard dividers to partition the pan into five V-shaped sections. Pour each colored mixture separately, then chill until set before removing dividers.
- → Can gelatin be substituted for a vegan alternative?
Yes, agar-agar works well as a vegan substitute and pairs nicely with coconut milk and cream for similar setting properties.
- → What types of fruit purees are best for this dessert?
Bright, flavorful purees such as raspberry, mango, kiwi, blueberry, and blackberry complement the colors and add contrasting tastes.
- → How should the base be prepared and chilled?
Crush digestive biscuits or graham crackers finely, mix with melted butter, press into the pan base firmly, and chill while preparing layers.
- → What is the recommended chilling time for the completed dessert?
After assembling and removing dividers, chill the dessert for at least two hours to allow all layers to fully set.