 Pin This
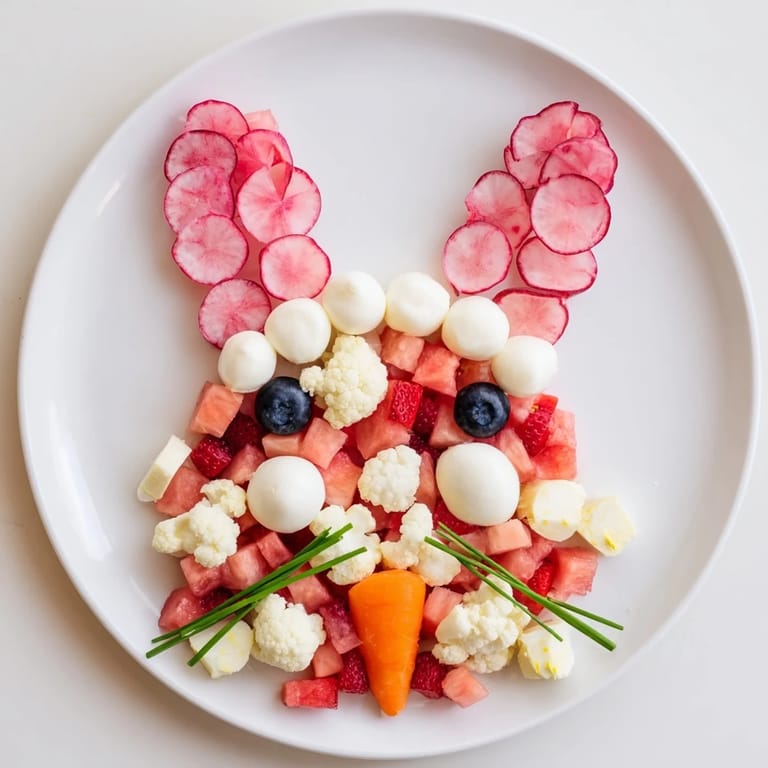
 I still remember the Easter morning when my daughter's face lit up at the sight of a pink bunny made entirely of food. I'd spent just twenty minutes arranging strawberries, mozzarella, and beets into a cheerful rabbit head, and suddenly the appetizer table felt less like a chore and more like magic. That's when I realized some of the most memorable dishes aren't complicated—they're just thoughtful, playful, and made with a little creativity.
I made this for a spring potluck once, nervous it might feel too silly for a casual gathering. Instead, it became the first thing to disappear, and three people asked for the recipe before dessert was even served. That's when I knew this wasn't just a cute idea—it was genuinely delicious and memorable.
Ingredients
- 1 large sheet parchment paper or serving platter: This is your canvas. Use something sturdy enough to hold the weight and large enough to let your bunny have personality.
- 1 cup black olives (whole or sliced, for outline): These create the bunny's silhouette and anchor everything in place. I learned to use whole ones for definition—they're easier to arrange than you'd think.
- 1 cup diced strawberries: Fresh, vibrant, and naturally sweet. The color is what makes this feel festive. Cut them the night before if you're short on time, but don't drain them too long or they'll dry out.
- 1 cup diced watermelon: This adds lightness and a playful pink tone. It's more delicate than strawberries, so add it closer to serving time.
- 1 cup pink beet hummus: The secret ingredient that ties the pink section together. It spreads like a dream and adds an earthy, sophisticated note that kids and adults both enjoy.
- 1/2 cup radish slices: These thin, peppery rounds add visual texture and a gentle bite. They're the ingredient that made me realize salad vegetables could shine in unexpected ways.
- 1 cup mini mozzarella balls: Creamy, mild, and endlessly customizable. The tiny size is crucial—larger pieces throw off the proportions.
- 1 cup cottage cheese, drained: You must drain this well, or it'll water down your white sections. I learned this the messier way, so trust me here.
- 2 hard-boiled eggs, sliced: These anchor the white filling and add protein. Slice them just before assembly so they stay fresh-looking.
- 1 cup cauliflower florets: Small, delicate florets work best. They're the ingredient that made me stop seeing cauliflower as boring.
- 1 tablespoon fresh chives, finely chopped (for whiskers): A small touch that feels like personality. Chives added three minutes before serving stay perky and green.
- 1 small piece of carrot (for the nose): Something small and vivid orange. A little decorative carrot cut adds that final whimsical touch.
- 2 blueberries (for the eyes): These are the bunny's expression. Choose firm ones or they'll roll away during assembly.
Tired of Takeout? 🥡
Get 10 meals you can make faster than delivery arrives. Seriously.
One email. No spam. Unsubscribe anytime.
Instructions
- Set your stage:
- Place your parchment paper or serving platter in front of you. Stand back for a moment and imagine where your bunny will live. The platter is your canvas, so give yourself space to work.
- Create the silhouette:
- Using black olives, outline a rabbit head with two long ears. Don't overthink this—I use about thirty olives to trace a simple bunny shape. The olives act as a border and a guide for where everything else goes. Step back and adjust until it feels right.
- Fill those ears with color:
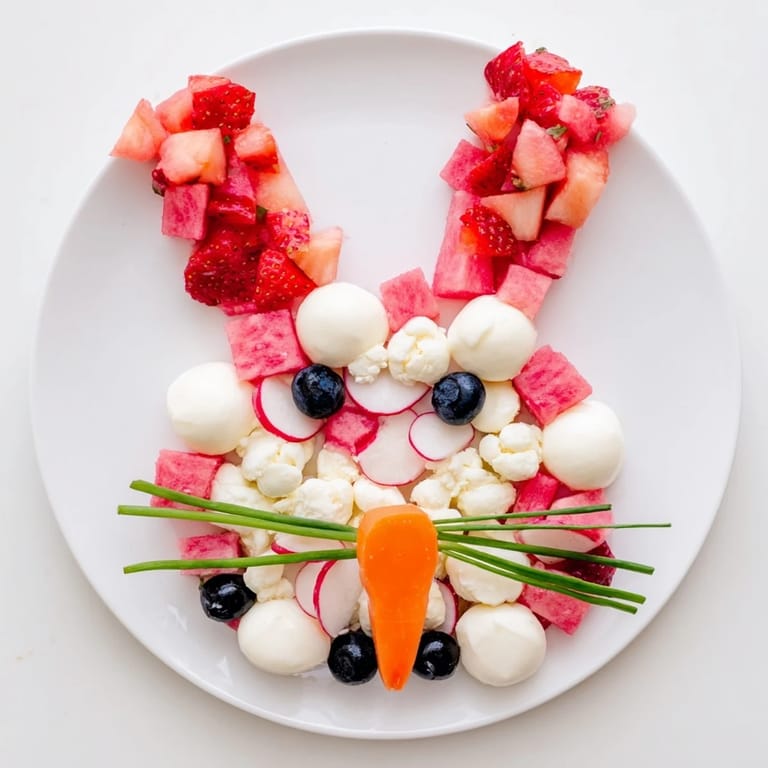
- Inside each ear outline, layer diced strawberries, watermelon, radish slices, and pink beet hummus. Alternate colors as you go—it creates a striped effect that feels artistic and intentional. Work in sections rather than trying to fill everything at once.
- Build the face:
- In the larger face section, gently arrange mini mozzarella balls, drained cottage cheese, hard-boiled egg slices, and cauliflower florets. Leave small gaps between ingredients—it lets colors breathe and makes the platter feel less cramped.
- Add the finishing details:
- Place two blueberries where the eyes should be, a small carrot piece for the nose, and arrange fresh chives in gentle whisker lines. These tiny touches transform it from just an arrangement into a character with personality.
- Chill and serve:
- Cover with plastic wrap and refrigerate until you're ready. Bring it out about fifteen minutes before serving so the ingredients taste fresh and cool, not ice-cold. Serve with crackers or vegetable sticks alongside.
 Pin This
 My favorite moment came when my five-year-old nephew pointed at the bunny and said, "It's too pretty to eat." Then he ate two heaping plates anyway. That's when I understood—this recipe isn't about complexity or technique. It's about creating a moment where food becomes joy, where a simple arrangement becomes a memory.
The Color Story Behind This Dish
Pink and white have always felt like spring to me. The pink section—strawberries, watermelon, beet hummus, radishes—reminds me of sunrise and fresh energy. The white section feels clean and bright. When you stand back and look at the finished bunny, those colors tell a story about the season. I've started thinking of this platter as edible storytelling, where each color choice means something. The contrast between the delicate pastels and the bold black olive outline is what makes it feel polished, not cutesy.
Making This Work for Your Kitchen
This recipe thrives on flexibility. Not everyone has pink beet hummus on hand, so I've swapped it for pink tzatziki, cream cheese mixed with diced beets, or even just reserved strawberry juice mixed into sour cream. The philosophy matters more than the exact ingredients—you're creating contrast between two color families and letting that guide your choices. I've also discovered that if you're nervous about assembly, laying everything out in small bowls first makes the actual plating feel like a puzzle rather than a performance.
Pairing and Presentation Tips
This bunny shines at gatherings where you want something that feels both special and approachable. Pair it with a light sparkling rosé or elderflower lemonade for a refined touch, or keep it simple with water and good conversation. The beauty of this platter is that it invites people to graze, to mix colors on their own plate, to get creative with what they pair together. I've learned that when food looks this good, it doesn't need to be complicated—it just needs to be genuine.
- Chill the platter for at least an hour before serving so all the delicate textures stay crisp and fresh.
- Arrange ingredients closer together than you think necessary—empty space reads as empty, but a full, colorful platter reads as abundant and joyful.
- If you're making this ahead, cover it with plastic wrap and refrigerate for up to four hours, but add the chive whiskers just before serving.
 Pin This
 Food is never just about flavor—it's about the moments we create around the table. This little bunny has a way of turning an ordinary spring gathering into something people remember. I hope it becomes one of those recipes you make again and again, adding your own small touches each time.
Recipe FAQ
- → How do I create the bunny outline?
Use whole or sliced black olives to form the bunny head and ears on parchment paper or a serving platter for a clear and defined edge.
- → Can I substitute any of the pink ingredients?
You can swap strawberries and watermelon for raspberries or pink grapefruit to maintain the vibrant pink hues.
- → What alternatives exist for dairy ingredients?
For a dairy-free version, replace mini mozzarella and cottage cheese with vegan cheese alternatives that complement the texture.
- → How should I serve this platter?
Serve chilled alongside crispbread, gluten-free crackers, or vegetable sticks for added crunch and contrast.
- → What makes this platter suitable for spring celebrations?
Its bright pink and white layers symbolize the freshness and colors of spring, making it an ideal centerpiece for festive gatherings.
- → Are there common allergens in this dish?
This platter contains dairy and eggs; check for fruit seeds and verify gluten-free status if catering to allergies.