 Pin This
 I still remember the December afternoon when my niece helped me arrange these little cheese snowmen on a platter for our family gathering. She was convinced they needed personalities, and by the time we added the olive eyes and carrot noses, even the adults were charmed. These Melted Snowman Cheese Bites became the unexpected star of that holiday party—not because they were complicated, but because they sparked joy before anyone even took a bite. Now, whenever winter arrives, I think of her small hands carefully pressing those mozzarella heads into place.
What surprised me most was how these humble cheese balls became a conversation starter at a Christmas party where I barely knew anyone. Guests kept picking them up, smiling at their little carrot noses, and suddenly we were all laughing and sharing favorite holiday traditions. That's when I realized food doesn't just nourish us—sometimes it opens doors to connection in the most unexpected ways.
Ingredients
- Cream cheese, softened: This is your foundation, and it needs to be genuinely soft or your mixture will be lumpy and frustrating. Take it out of the fridge at least thirty minutes before you start, or if you're in a hurry, cut it into small cubes and it'll soften faster.
- Grated mozzarella cheese: Fresh mozzarella melts beautifully and keeps the mixture creamy instead of dense. Pre-shredded works in a pinch, but fresh makes a noticeable difference.
- Sour cream: This adds tang and keeps everything smooth and spreadable. Don't skip it thinking you can just use more cream cheese.
- Garlic powder and onion powder: These humble seasonings do the heavy lifting, adding complexity that makes people wonder what your secret is.
- Salt and pepper: Taste as you go—you want enough to make the cheese sing without overpowering it.
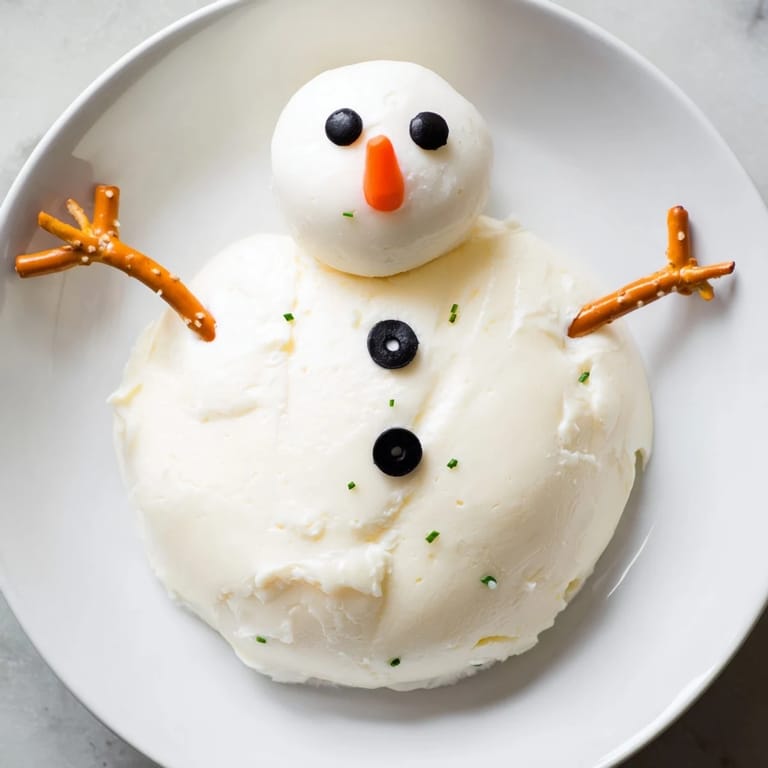
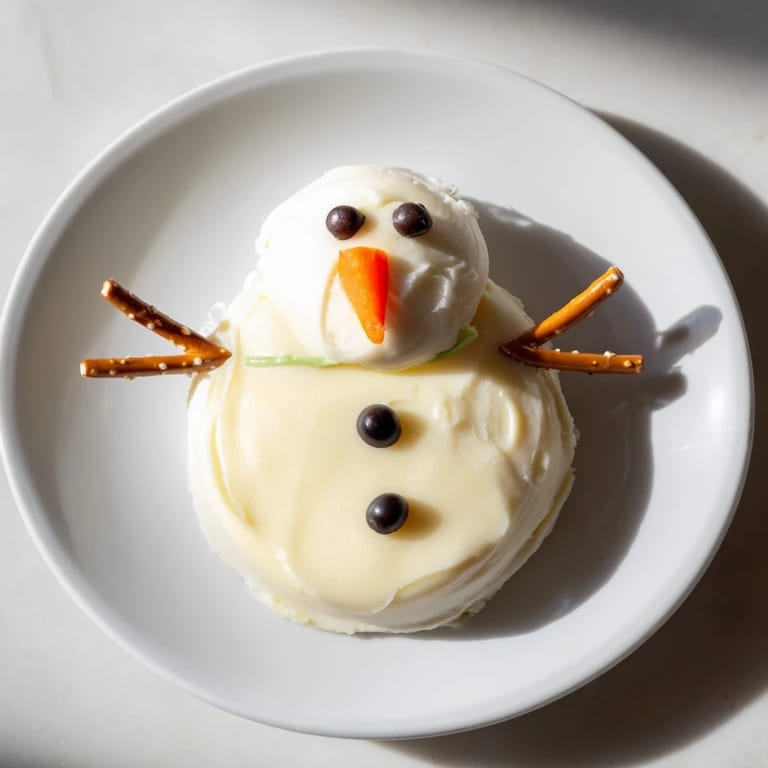
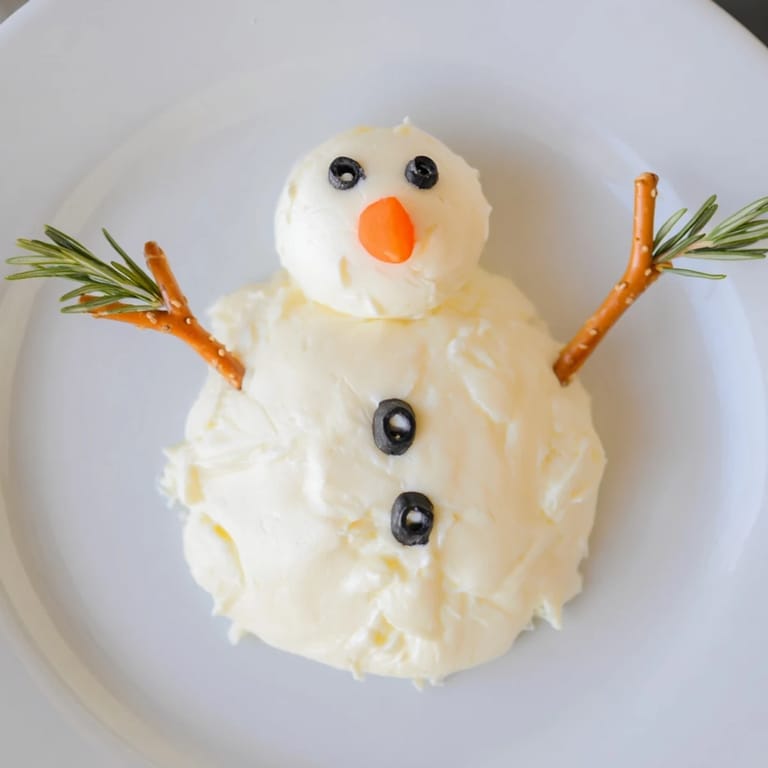
- Small mozzarella balls: These become the heads and should be roughly the size of a cherry tomato. Bocconcini or ciliegine work perfectly.
- Black olive slices: These create those charming button and eye details. I use about three per snowman for the best visual effect.
- Carrot tips: A tiny sliver of carrot becomes the perfect little nose. I peel thin strips and cut them into small triangles.
- Pretzel sticks: These are the arms, and they'll stay crisp if you add them right before serving rather than hours ahead.
- Fresh chives or parsley: Optional, but they make wonderful scarves that add a final touch of character to each snowman.
- Crackers or sliced baguette: Your guests will want something to scoop with, and these are the perfect complement.
Tired of Takeout? 🥡
Get 10 meals you can make faster than delivery arrives. Seriously.
One email. No spam. Unsubscribe anytime.
Instructions
- Mix your cheese base into creamy perfection:
- In a bowl, combine the softened cream cheese, grated mozzarella, sour cream, garlic powder, onion powder, salt, and pepper. Use a spoon or spatula to fold everything together until it's smooth and well combined. The texture should be spreadable but still hold its shape—if it feels too soft, you might need to chill it for a few minutes.
- Form the snowman bodies:
- Using your hands or a spoon, create twelve cheese balls about the size of a golf ball, using roughly two tablespoons of mixture for each. Arrange them on your serving platter with a little space between them. Gently flatten the tops and press the edges slightly so they have that melted, dripping effect that makes them look so whimsical.
- Add the snowman heads:
- Take one small mozzarella ball and gently press it onto the top of each cheese base. It should stick naturally from the moisture, but be gentle and patient with it. If one feels loose, you can add the tiniest dab of extra sour cream to help it adhere.
- Bring them to life with decorations:
- Now comes the fun part. For each snowman, arrange three black olive slices down the body for buttons, then add two more for the eyes on the head. Press a small carrot tip into the mozzarella head as the nose. Insert two pretzel sticks into the sides of the base for arms. If you're using fresh herbs for a scarf, wrap a thin strip around the neck where the body meets the head.
- Serve with joy:
- Arrange your snowmen on the platter with crackers or baguette slices nearby, and watch as people's faces light up. Serve immediately so the pretzel arms stay crisp and everything looks fresh.
 Pin This
 I remember my grandmother watching me make these for the first time and saying they were too pretty to eat. But then she picked one up anyway, tasted the creamy, garlicky cheese, and understood immediately that sometimes the most memorable dishes are the ones that make us smile before we even take a bite. That's the real magic of these little snowmen.
Flavor Building and Customization
The beauty of this recipe is that the cheese base is your canvas. I've experimented with adding fresh dill for an herbaceous twist, and I've seen friends add everything from fresh thyme to a whisper of truffle oil. Some of my favorite discoveries came from thinking about what flavors I love and wondering if they'd work in the cheese mixture. The answer is almost always yes. Start with the base recipe, then taste and adjust. Maybe you're someone who loves heat—a tiny pinch of cayenne or hot sauce could be interesting. Or perhaps you lean toward brightness—lemon zest would be delicious. Trust your instincts and your palate.
Making Ahead and Presentation Tips
One of the greatest gifts this recipe gives you is flexibility. You can form and decorate the snowmen up to two hours ahead of your gathering, then refrigerate them until it's time to serve. When your guests arrive, you simply add the pretzel arms at the last moment, and everything looks fresh and intentional. I've also learned that the platter itself matters—I like to use something with a slight rim so the cheese doesn't spread too far, and I always leave a little space between each snowman so they feel like individual characters rather than a blob. Sometimes I arrange them in a little formation, almost like they're having a conversation with each other.
Variations and Seasonal Ideas
While these are perfect for winter, I've made them year-round by changing the decorations. For summer parties, I've used roasted red pepper strips instead of black olives and created little carrot scarves instead of pretzel arms. Around Thanksgiving, I've swapped the carrot nose for a tiny piece of roasted sweet potato. The cheese base stays the same, but the possibilities for personality are endless. Here are some quick adjustments that keep things interesting:
- Use roasted red pepper strips for scarves or hats instead of fresh herbs for a more colorful, slightly smoky flavor
- Add fresh herbs like dill or chives directly into the cheese mixture for extra depth of flavor
- If you need gluten-free options, swap pretzel sticks for thin vegetable strips or even crispy bacon pieces for arms
 Pin This
 These little cheese snowmen have taught me that the most memorable dishes aren't always the most complex—they're the ones made with intention and served with a smile. I hope they bring as much joy to your table as they've brought to mine.
Recipe FAQ
- → How do I shape the cheese balls evenly?
Use slightly dampened hands to form smooth, evenly sized cheese balls so they hold together well and resemble snowmen bases.
- → Can I prepare the cheese bites ahead of time?
Yes, assemble the cheese bases up to 2 hours prior and refrigerate. Add pretzel arms just before serving to keep them crisp.
- → What can I substitute for black olive slices?
Thin slices of ripe olives or small pieces of black peppercorns can be used for buttons and eyes.
- → Are there gluten-free serving options?
Serve these bites with gluten-free crackers or sliced gluten-free baguette to accommodate dietary needs.
- → How can I add more color to the presentation?
Wrap fresh chives or parsley around the neck like scarves or add roasted red pepper strips for a vibrant touch.