 Pin This
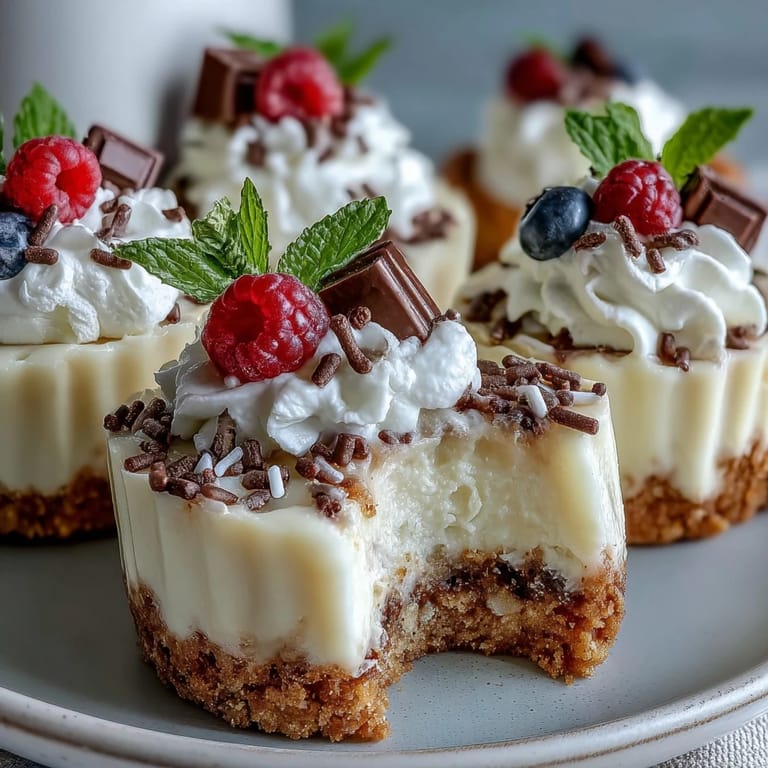
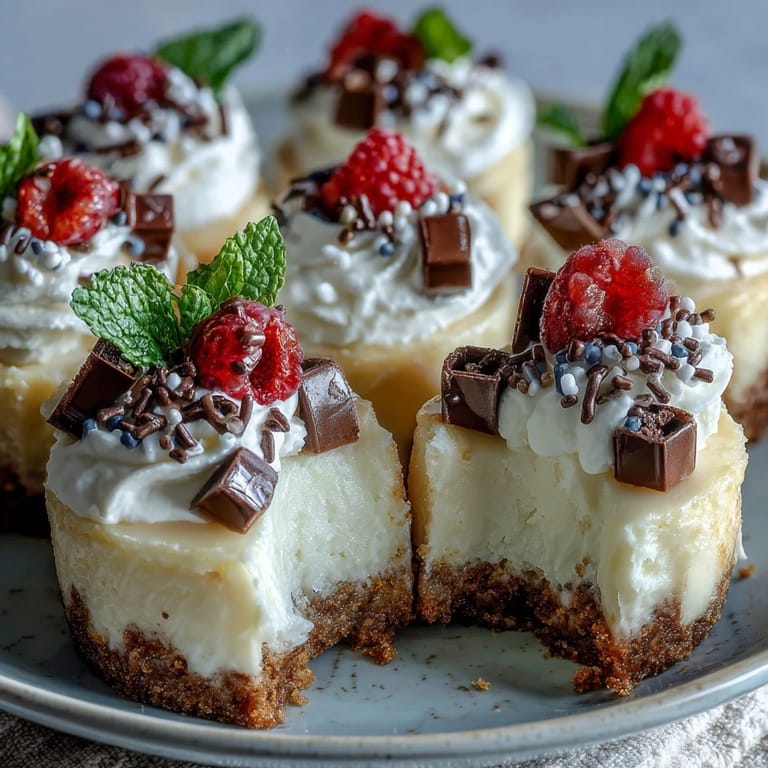
 The way the scent of warm, sweet cheesecake drifts through the kitchen is one of those instant mood lifters. I didn't plan for these cheesecake bites to be a party showstopper, but the cheerful clinks of mini muffin pans soon had me humming along to graduation-themed playlists. There's something satisfying about each step—the buttery crust, velvety filling, billowy whipped cream. Even the sprinkles get their moment in the spotlight. It's a recipe that always brings a sense of celebration, no matter the occasion.
Last spring, I made these for my cousin’s graduation, and the kitchen buzzed with excitement as family debated over which toppings looked more festive. My niece insisted on adding extra chocolate 'caps' to hers, and somehow I ended up laughing more than baking. Despite tiny fingerprints in the whipped cream, the whole batch disappeared before dinner hit the table. That day, each bite was a tiny high five for our grad and a reminder that food can be as joyful as the people who share it.
Ingredients
- Graham cracker crumbs: They create a sturdy, golden base—pulse them yourself for extra freshness or use pre-ground to save time.
- Granulated sugar: A touch in both crust and filling adds essential sweetness and balances the slight tang of cream cheese.
- Unsalted butter: Melted for easy mixing, it brings the crust together without overwhelming the cheesecake’s creamy flavor.
- Cream cheese: Softened cream cheese blends smoothly and gives that signature cheesecake silkiness—avoid cold, lumpy blocks at all costs.
- Eggs: Each egg gives a custardy texture; always add them one at a time for a smooth, even filling.
- Pure vanilla extract: A little goes a long way in deepening the filling’s flavor—don’t settle for imitation if you can help it.
- Sour cream: Helps achieve that just-right, velvety texture and a touch of tanginess that keeps every bite bright.
- Salt: Just a pinch brings out all the other flavors—don’t skip it, even if it seems unnecessary.
- Whipped cream: For lightness and a festive topping, especially fluffy if you whip it yourself.
- Festive sprinkles or mini chocolate graduation caps: The fun detail that turns these from tasty to memorable—get creative with edible decorations.
- Fresh berries: For a juicy burst of color and tartness, making each bite feel fresh and celebratory.
Tired of Takeout? 🥡
Get 10 meals you can make faster than delivery arrives. Seriously.
One email. No spam. Unsubscribe anytime.
Instructions
- Prep the Pan:
- Line your mini muffin tin with paper liners—trust me, wrestling warm cheesecake bites out without them is a fool’s errand.
- Mix and Press the Crust:
- Combine the graham crumbs, sugar, and butter until you have sandy, fragrant crumbles, then press about a tablespoon into each liner with your fingers or the back of a spoon.
- Bake the Base:
- Pop the crusts in the oven for five minutes, just enough to set them and draw out a toasty aroma.
- Make the Filling:
- Beat the cream cheese till cloud-light, then blend in sugar, eggs (one at a time), vanilla, sour cream, and salt—stop mixing as soon as it all looks glossy and smooth.
- Fill the Cups:
- Spoon or pipe the creamy batter almost to the top of each crust and smooth the surface as best you can.
- Bake Again:
- Return the pan to the oven, baking until the centers just barely wobble when you nudge them—don’t wait for a firm set.
- Cool Gradually:
- Let the bites rest in the pan before moving them to a rack, then chill thoroughly so every bite sets up soft yet sliceable.
- Decorate and Serve:
- Just before serving, crown with whipped cream, berries, sprinkles, or those cheeky chocolate caps—watch as smiles break out at the table.
 Pin This
  Pin This
 The best compliment I got was at my neighbor’s graduation party, when the room quietly emptied as guests made second and third trips to the dessert table for these cheesecake bites. No one asked for a fork—just one bite, then another, then a shared laugh about whose ‘cap’ had the biggest swirl. Suddenly, these little cheesecakes became the centerpiece of the whole celebration.
Making Them in Advance (and Stress-Free!)
One thing I learned is that these cheesecake bites are even better when made ahead and left to chill overnight. Taking a little prep pressure off lets you enjoy the actual party more—and keeps the cheesecakes perfectly creamy and sliceable.
Swapping Crusts and Toppings
Don’t hesitate to switch up the crust—crushed chocolate cookies give a deeper, cocoa-rich flavor while gingersnaps add warmth and spice. Toppings are your playground: I love how berries and a little lemon zest make them feel extra fresh for a summer celebration.
Party Serving Hacks: Crowd Pleasers Every Time
Arranging the bites in rows on a tiered stand makes them easy for guests to grab and admire, but you can also pop them onto a platter with tongs for quick crowd access.
- If you’re short on time, buy pre-whipped cream and decorate just before guests arrive.
- Keep extra toppings on the side for customizations—everyone loves building their own tiny masterpiece.
- Letting the bites warm up for 10 minutes before serving gives them the creamiest texture.
 Pin This
 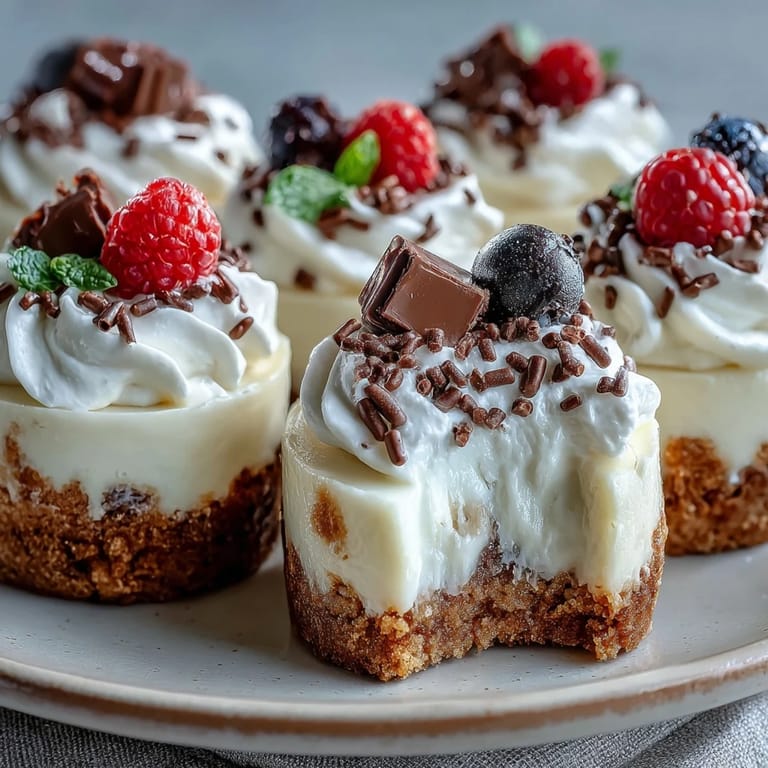 Pin This
 I hope every grad in your life gets as much joy out of these cheesecake bites as my friends and family have. They’re tiny, celebratory, and just fun—kitchen victories worthy of a cap toss all their own.
Recipe FAQ
- → How can I prevent the filling from cracking?
Avoid overmixing and bake just until the centers are set with a slight jiggle. Let the bites cool gradually in the pan for 10 minutes, then transfer to a rack before chilling to reduce cracking.
- → Can I swap the graham crust for something else?
Yes — use chocolate cookie crumbs or crushed shortbread for a different flavor and texture. Adjust the sugar if the cookies are already sweet.
- → How long should I chill before serving?
Chill at least 30 minutes to firm up, though 1–2 hours improves texture and makes slicing or removing liners neater. They also keep their shape better when fully cold.
- → Are these suitable for making ahead?
Absolutely. Make them a day ahead and refrigerate in an airtight container. Add whipped cream and delicate decorations just before serving to keep them fresh.
- → Can I freeze the bites?
Freeze uncovered on a tray until firm, then transfer to a sealed container with parchment between layers. Thaw in the refrigerator before serving and add toppings after thawing.
- → How do I know when the centers are done?
Bake until the edges are set and the centers have a slight jiggle when the tin is gently shaken. They will continue to firm as they cool and chill.